HomeUser Guide › Getting started
Getting started

Connected in under a minute

Nothing gets installed on the NAS. Syno Manager talks to DSM's own APIs, which are already running - you just tell it where your DiskStation is and who you are.
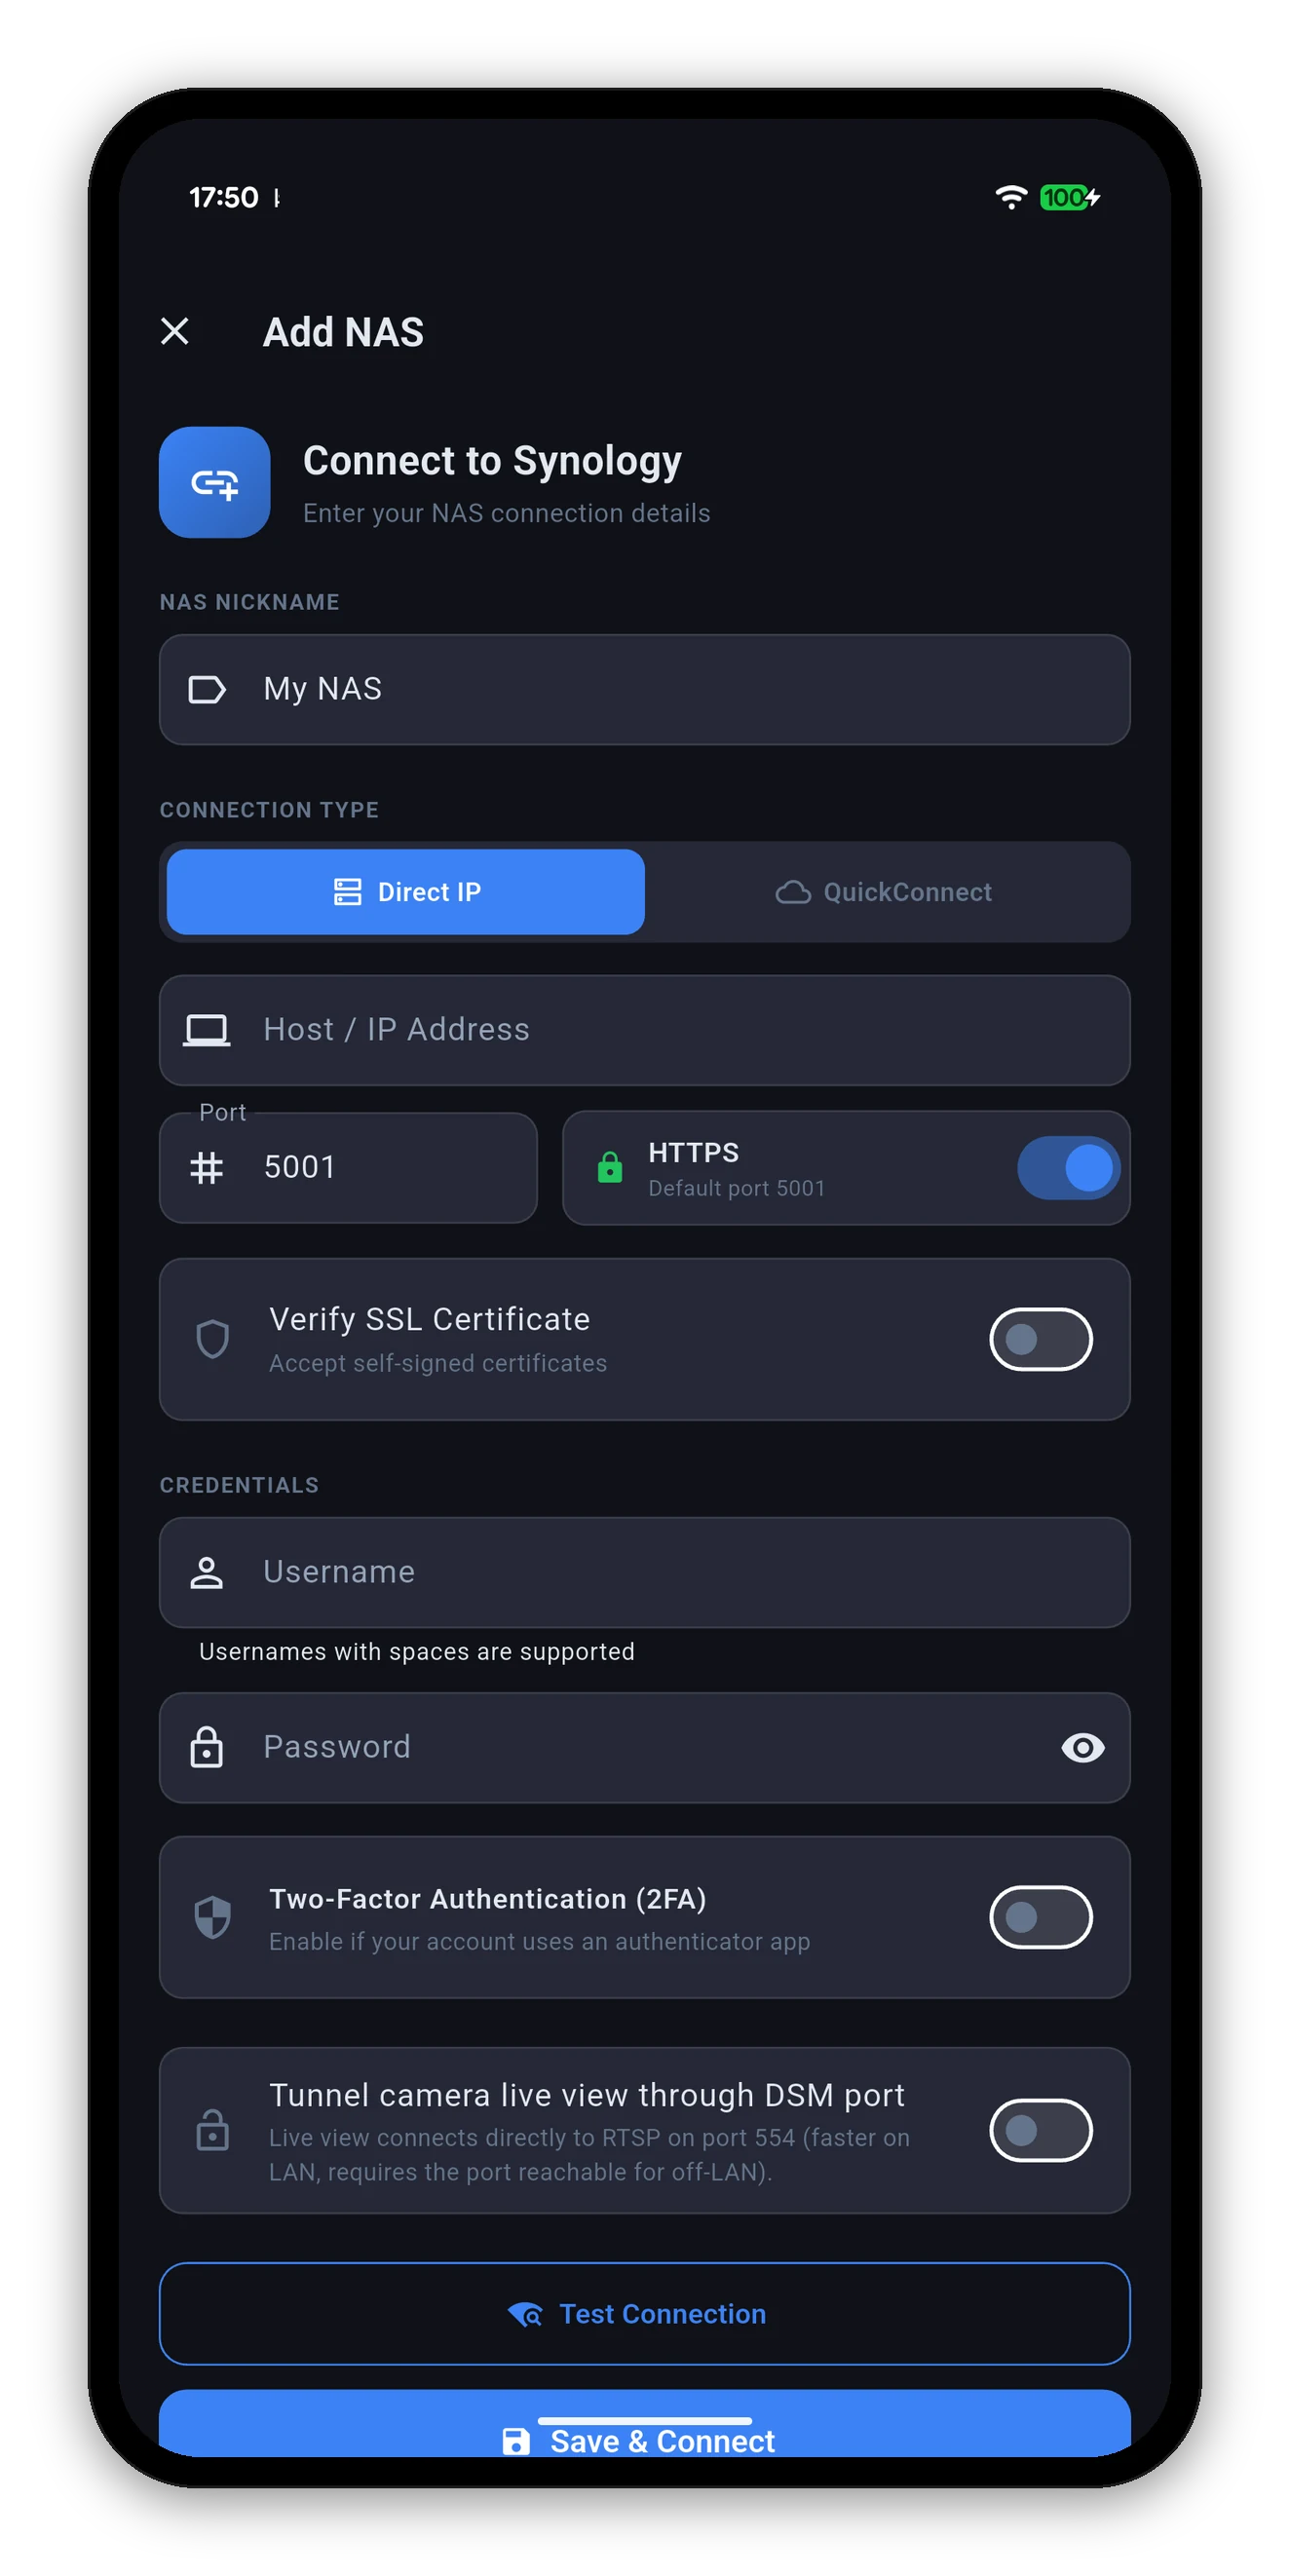
The Add NAS form in Syno Manager
Step zero

What you need

RequirementDetail
A Synology NASAny model running DSM 7.0 or later. Nothing is installed on it - the app uses the same APIs DSM's web interface uses.
A DSM accountYour normal DSM username and password. An administrator account sees everything; a non-administrator sees what DSM lets it see, and the app hides the rest rather than showing controls that will be refused.
Your deviceAndroid 7.0 or later, iOS 16.0 or later, macOS 11.0 or later, or Windows. Same app on all four.
A route to the NASThe same local network, a VPN into it, a custom domain, or QuickConnect. Any one of them is enough.
You do not need an administrator account just to look. Monitoring works for any DSM user. Control actions - restarting a container, running a backup, ejecting a drive - need whatever permission DSM itself requires for that action, and the app reports a refusal rather than pretending it worked.
Where is it

Finding your NAS address

If you already open DSM in a browser, the address bar has everything you need: the host and the port are the two values the app asks for.

From DSM itself

  • Control Panel › Network › Network Interface shows the NAS's IP address on each interface.
  • Control Panel › Network › DSM Settings shows the HTTP and HTTPS ports DSM is listening on. These are 5000 and 5001 unless somebody changed them.

From your browser

Whatever you type to reach DSM is what the app wants. In https://192.168.1.20:5001 the host is 192.168.1.20, the port is 5001, and HTTPS is on.

From your router

Most routers list connected devices by name. The NAS appears under its server name - the one set in Control Panel › Info Center.

Give it a fixed address. If your router hands the NAS a different IP after a reboot, the app will stop finding it. A DHCP reservation on the router, or a static address on the NAS, prevents that. A hostname or a custom domain works too and does not care what the IP is.
Add NAS

Every field on the form

Tap + Add NAS on the device list. The form is short, and only three fields have no sensible default.

FieldWhat to put in it
NAS NicknameAny name you like - it is only ever shown to you. Useful once you have more than one.
Connection TypeDirect IP for an address you type, or QuickConnect for a QuickConnect ID. See below.
Host / IP AddressThe NAS's local IP, its hostname, or a custom domain that points at it.
Port5001 with HTTPS on, 5000 with it off - unless DSM was moved to different ports, in which case use those.
HTTPSOn by default, and worth leaving on. Everything between the phone and the NAS is encrypted, including your password.
Verify SSL CertificateOff by default, because most DiskStations present a self-signed certificate that cannot be verified against a public authority. The connection is still encrypted either way. Turn this on only if you have installed a real certificate.
UsernameYour DSM account name. Usernames containing spaces are supported - the app quotes them correctly, which is a common reason other clients fail.
PasswordYour DSM password. The eye reveals it while you type. It is written to the platform keychain or keystore and never stored in plain text.
Two-Factor AuthenticationTurn on if your DSM account uses an authenticator app. See below.
Tunnel camera live view through DSM portOff by default. Off means camera live view connects straight to RTSP on port 554, which is faster on your own network but needs that port reachable from wherever you are. On tunnels the stream through the DSM HTTPS port you already use, so live view works from outside without exposing 554. See Surveillance Station.
The Add NAS form
No address to type

QuickConnect

Switch Connection Type to QuickConnect and enter your QuickConnect ID instead of a host and port. Synology's relay finds your NAS wherever it is, and no router configuration is involved.

You can have both. Adding the same NAS twice - once by local IP, once by QuickConnect - gives you a fast entry for home and a reliable one for away. They are separate entries with separate layouts, so pick whichever you are nearer to.
2FA

Two-factor authentication

If your DSM account is protected by an authenticator app, turn Two-Factor Authentication (2FA) on before saving. The app asks for your six-digit code straight after the password is accepted.

  1. Enable the toggle on the Add NAS form.
  2. Save & Connect. The app signs in, and DSM asks for the second factor.
  3. Enter the code from your authenticator.
  4. Choose whether to remember this device. If you do, DSM issues a device token and this phone is not asked for a code again. The token is stored the same way the password is, in the platform keychain.
If codes are rejected, check the clock. Authenticator codes are derived from the current time, so a phone or a NAS whose clock has drifted will generate or expect the wrong number. The NAS's time source is shown on the home screen quick-stats row.
Before you commit

Test Connection, then save

Test Connection tries the address, the port and the credentials and tells you what happened without saving anything. It is the fastest way to find a typo, because it separates "cannot reach the NAS" from "reached it, but that password is wrong".

What it saysWhat it means
Connection timeoutNothing answered. The address, the port, or the network the phone is on - not the credentials, which were never tried.
Invalid credentialsThe NAS answered and rejected the sign-in. The address and port are right; the username or password is not.
Certificate errorHTTPS is on and Verify SSL Certificate is also on against a self-signed certificate. Turn verification off.
2FA requiredThe account uses two-factor authentication and the toggle is off. Turn it on and try again.

Save & Connect stores the entry and signs in. You land on the home screen with your NAS already loading.
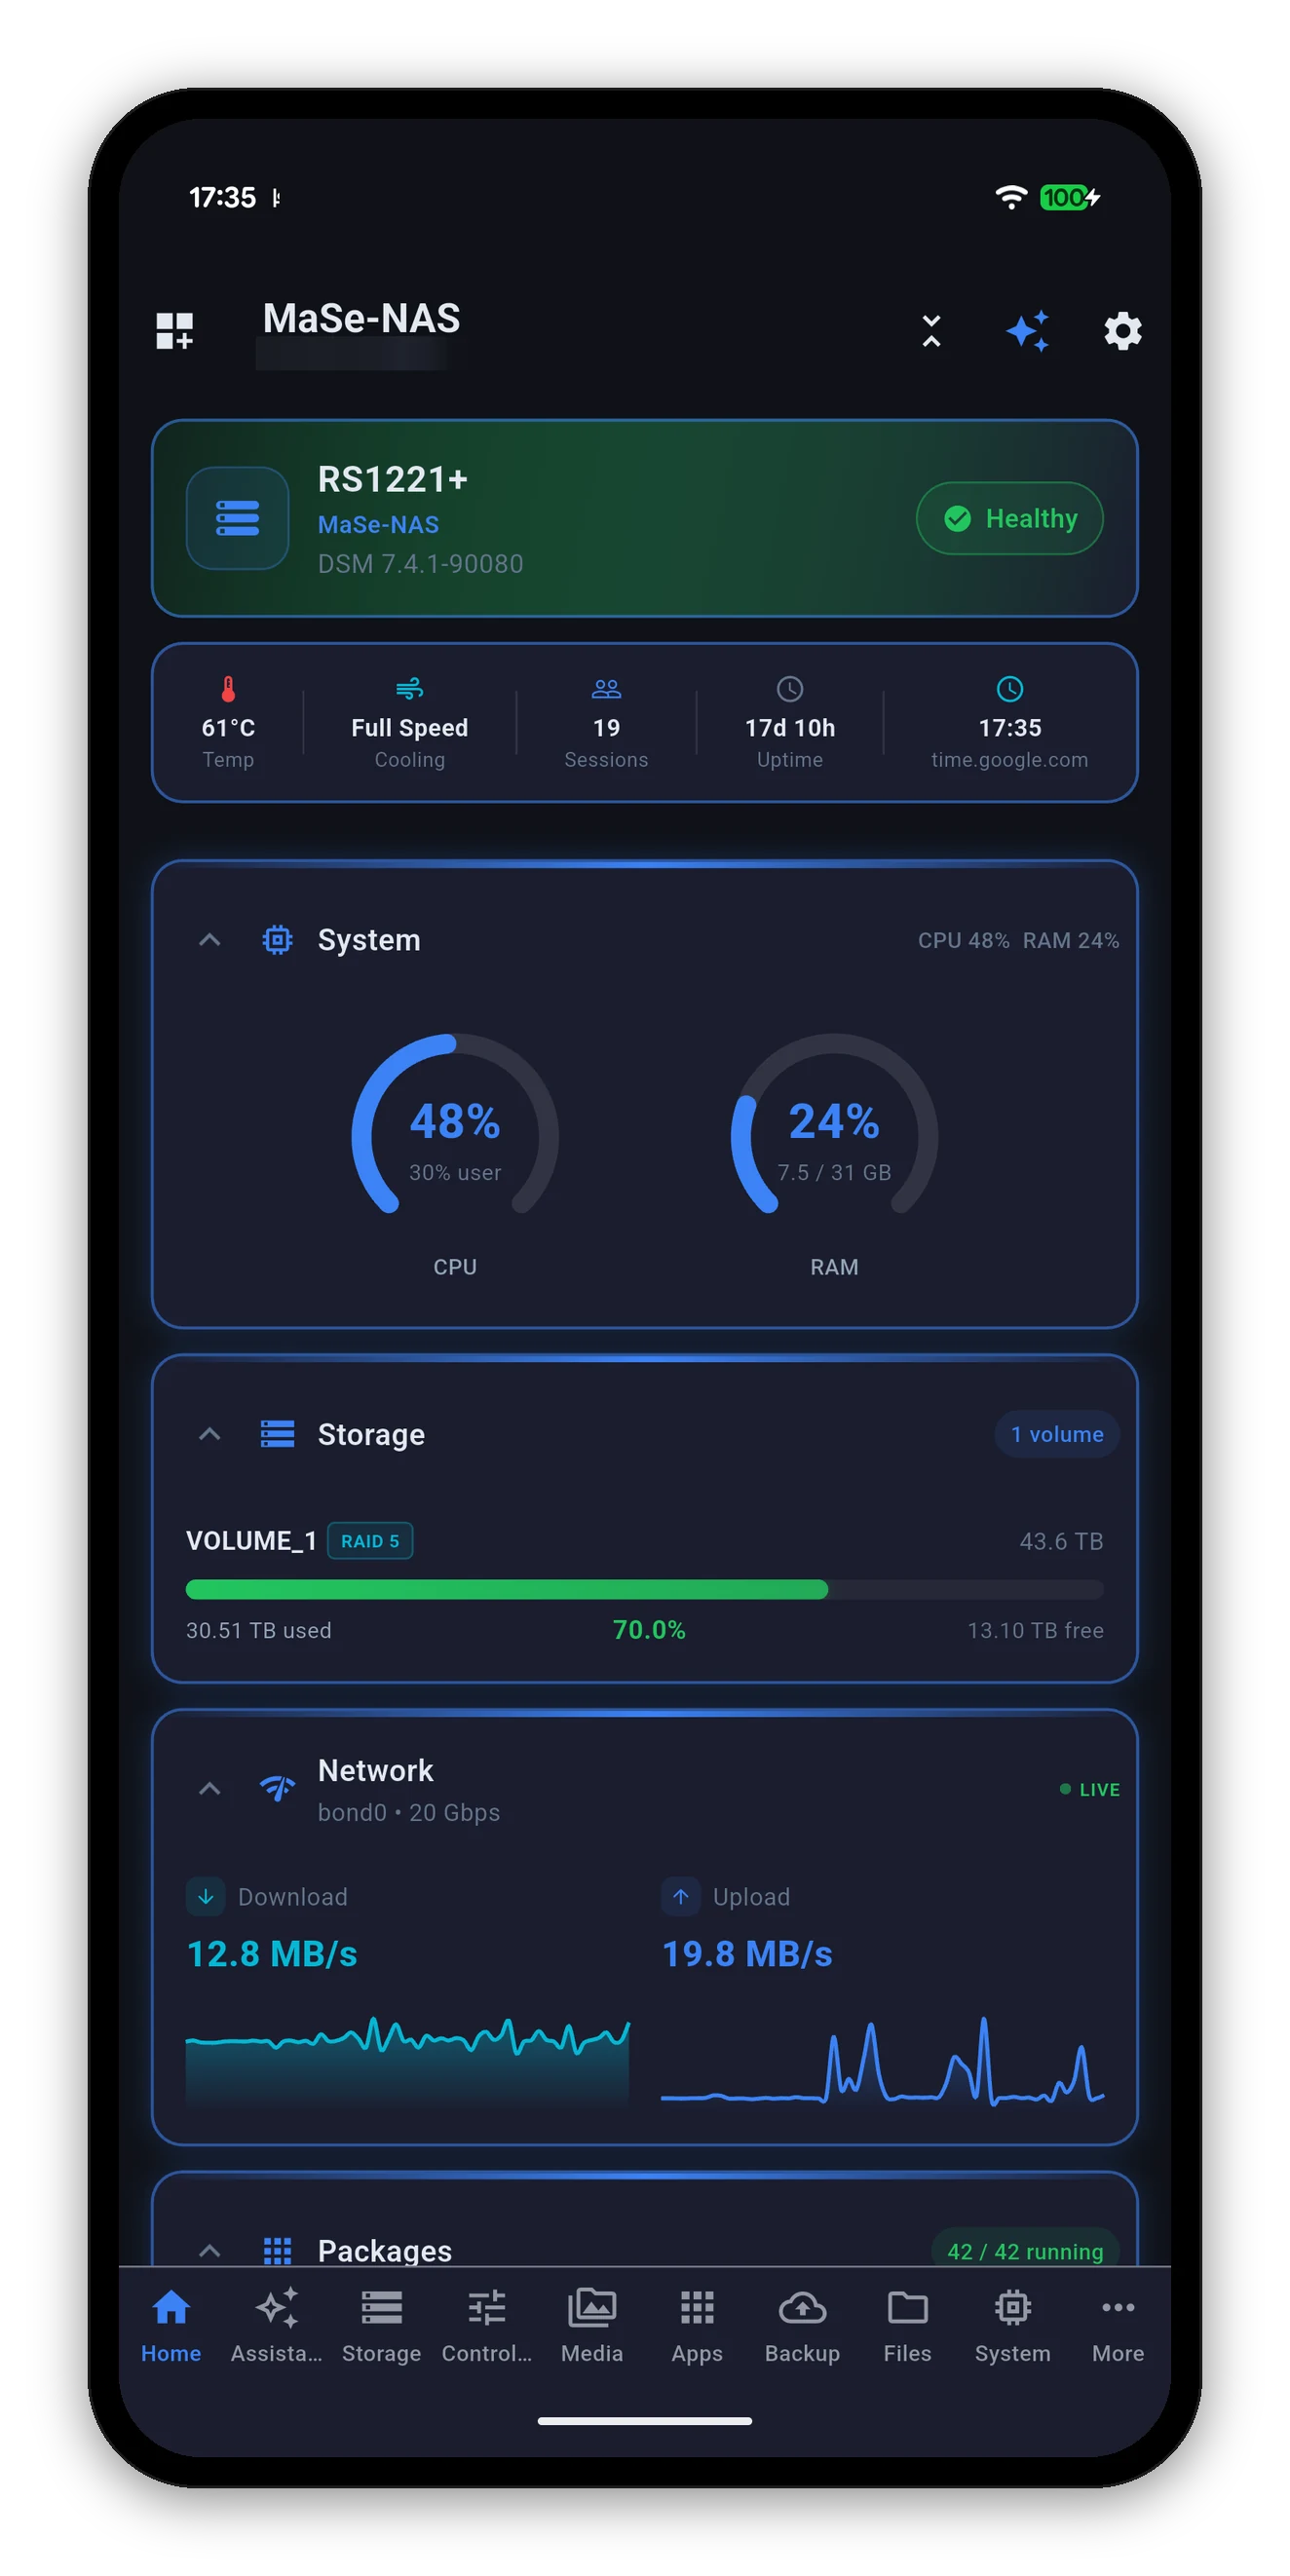
The Syno Manager home screen after connecting
  • The app asks what your NAS can do. It queries DSM's API catalogue and keeps the list. That is why a NAS without Surveillance Station never shows a Cameras tab, and why installing a package makes its screen appear.
  • Every supported card is switched on. New cards arrive visible rather than hidden, so a feature your NAS supports is one you can see. Customize is where you turn things off, not where you go to find them.
  • The NAS's MAC address is captured so Wake-on-LAN can work later without you looking it up.
  • A short welcome appears once. It says what the app does and where to change things. There is a checkbox to stop it appearing again.
  • Help cards appear on screens that need explaining. Long-press one to dismiss it; restore them individually from Settings.
Installed a package after connecting? The capability list is read at connect time, so a package installed since then will not have a tab yet. Pull to refresh, or reopen the app, and the new screen appears.
When it will not connect

The short checklist

  1. Open DSM in the phone's browser at exactly the address and port you typed. If the browser cannot reach it either, the problem is the network or the address, not the app.
  2. Check HTTPS matches the port. Port 5001 with HTTPS off, or 5000 with it on, will time out. They are different listeners.
  3. Turn off Verify SSL Certificate if the NAS uses the certificate it shipped with.
  4. Check the phone's network. A local IP is unreachable over mobile data. Either join the Wi-Fi, or use QuickConnect, a domain or a VPN.
  5. On iOS, allow local network access. Settings › Apps › Syno Manager › Local Network. Without it, iOS silently blocks connections to addresses on your own network.
  6. Check DSM's firewall. Control Panel › Security › Firewall. A rule that allows only certain addresses will block a phone that is not one of them.
  7. Check auto-block. Control Panel › Security › Account. Repeated failed sign-ins can block your phone's address; it will be listed there and can be removed.

Full troubleshooting guide

Common questions

Setup FAQ

What do I need to use Syno Manager?
A Synology NAS running DSM 7.0 or later, a DSM account on it, and a device running Android 7+, iOS 16+, macOS 11+ or Windows. Nothing has to be installed on the NAS - the app uses DSM's own APIs, which are already there.
What address and port do I enter?
On your own network, the NAS's local IP address and DSM's port - 5001 with HTTPS on, or 5000 with HTTPS off. You can also enter a hostname or a custom domain. If you would rather not deal with addresses at all, switch Connection Type to QuickConnect and enter your QuickConnect ID.
Why is Verify SSL Certificate off by default?
Because most DiskStations present a self-signed certificate, which is not signed by a public authority and therefore fails verification even though the connection is still encrypted. Leaving verification off accepts that certificate. If you have installed a real certificate - from Let's Encrypt, for example - turn verification on.
Do I need to open ports on my router?
No. On your own network nothing needs forwarding. From outside, QuickConnect relays the connection for you, and a VPN works too. Port forwarding is only needed if you specifically want a direct route from the internet, or if you want camera live view over RTSP from outside your network.
It says connection timeout. What now?
That message means the app never got an answer, which is almost always the address, the port, or the network the phone is on. Check that HTTPS matches the port, that the phone is on the same network as the NAS if you are using a local IP, and that DSM's own web interface loads in the phone's browser at the same address and port.
Can I add more than one NAS?
Yes, as many as you like. Each keeps its own credentials, dashboard layout and settings, and you switch between them from the device list. See multiple NAS devices.

Next: the home screen

What every card shows, and how to make the dashboard yours.
The home screen →   Back to the guide